1. 概述
Java NIO(New Input / Output)是从Java 1.4版本开始引入的一个新的IO API,可以替代标准的Java IO API,Java NIO用于解决传统I/O阻塞的痛点,引入了通道、缓冲区和选择器等相关的概念:
通道(Channel)是对原I/O包中流的模拟,可以通过它进行数据的读取和写入
缓冲区(Buffer)则是提供给通道进行数据读写的中间介质,所有的读写操作都需要通过缓冲区进行
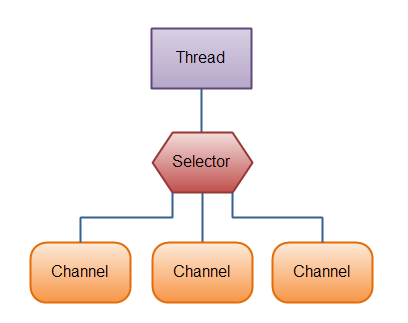
选择器(Selector)主要用于通过轮询的方式去监听多个通道Channel上的各类事件
Java NIO和Non-blocking IO之间有什么关联?
Java NIO实际上指代的是Java 1.4版本的New IO,一套可直接使用的API,其底层实现其实包含了Non-blocking IO,Java NIO实际上提供了阻塞模式和非阻塞模式
Non-blocking IO指的是非阻塞IO,非阻塞 I/O 模型允许单个线程处理多个 I/O 操作,通过非阻塞模式,线程可以注册事件(如读、写)并在事件就绪时进行处理,而不必一直等待
新I/O包中Channel和原I/O包的Stream之间的区别?
传统的IO是对字节流的读写,在进行IO前会创建一个流对象(比如
BytesInputStream或者BytesOutputStream),流对象进行读写的操作都是按字节进行的,也就是按照字节挨个进行读写新的I/O包位于
java.nio包下,其底层将IO抽象为块,类似于磁盘的读写,每次I/O操作的单位都是一个块,块被读入内存后,就是一个byte[],也就是说NIO一次可以读取或写入多个字节数组简单地理解,旧IO包中是以流的方式处理数据,而NIO中则是以块的方式处理数据,面向流的IO输入和输出都分别一次只能处理一个字节的数据,面向块的IO一次处理一个数据块,按块来处理数据会有更高的效率,但是面向块IO缺少了面向流IO的一些优雅性和简单性
什么是Java NIO.2?
Java 1.7开始对旧的I/O包(包路径:
java.io.*)做了优化,Java 1.7优化过后的I/O包,也被称为是NIO.2,过程中引入了NIO的核心概念,比如通道(Channel),以FileInputStream为例,引入了FileChannel的概念用于加快整个文件传输的过程,可以通过提供的getChannel方法拿到文件通道并直接使用它的API特性,比如:高效的缓冲区传输、类似于指针的任意文件位置访问,FileInputStream也保留了原始的API操作方式除了
FileChannel概念之外,还引入了异步IO(Asynchronous I/O),比如AsynchronousFileChannel、AsynchronousSocketChannel等支持异步文件和网络I/O以下是一个
FileOutputStream的例子:
2
3
4
5
6
7
8
9
10
11
12
13
public static void main(String[] args) {
try (var fileOutputStream = new FileOutputStream("test.txt")) {
var fileChannel = fileOutputStream.getChannel();
var buffer = ByteBuffer.allocate(1024);
buffer.put("Hello, NIO.2!".getBytes());
buffer.flip();
fileChannel.write(buffer);
} catch (IOException e) {
e.printStackTrace();
}
}
>}其中使用
fileChannel对象进行数据的整块写入以上代码中为什么需要调用
buffer.flip()方法?
ByteBuffer有两种模式:写模式 和 读模式将数据写入
ByteBuffer时,它处于 写模式,当要从ByteBuffer中读取数据时,它需要切换到 读模式
- 写模式:
- 在写模式下,
ByteBuffer的position(当前位置)从 0 开始递增,表示当前写入的位置,limit(限制)通常是缓冲区的容量(即capacity)put()方法会将数据写入缓冲区,并递增position
- 读模式:
- 在读模式下,需要将
position重新设置为 0(从头读取),并将limit设置为刚刚写入数据的结束位置flip()方法做的正是这一点:将当前的position设置为 0,limit设置为之前的position
块式操作有什么优势?
块操作能够显著减少操作系统与Java程序之间的上下文切换次数,以及内存复制操作的次数,从而提高I/O效率
2. Channel
一个通道Channel同时支持对数据的读取和写入,它与传统IO的流区别在于,一个流只能在一个方向上进行数据传输,要么是数据读取,要么是数据写入,也就是对应了InputStream和OutputStream的子类,而通道 - Channel则是双向的,可以用于读/写或同时用于读写
ByteBuffer是唯一一个能直接与Channel信道通信的 Buffer缓冲区
Java为Channel接口提供的实现类如下:
- FileChannel:用于读取、写入、映射和操作文件的通道
- DatagramChannel:通过UDP读写网络中的数据通道
- SocketChannel:通过TCP读写网络中的数据
- ServerSocketChannel:可以监听新进来的TCP连接,像 Web 服务器那样,对每一个新进来的连接都会创建一个SocketChannel
FileChannel常用方法:
| 方法 | 描述 |
|---|---|
| open(Path path, OpenOption… options) | 打开或创建一个文件,并返回一个接入该文件的Channel通道 |
| read(ByteBuffer dst) | 从Channel中读取数据到ByteBuffer缓冲区中 |
| write(ByteBuffer src) | 将ByteBuffer缓冲区中的数据写入到Channel通道中 |
| long position() | 返回此通道的文件位置 |
| FileChannel position(long newPosition) | 根据文件位置获取文件通道对象 |
| long size() | 获取当前文件通道的大小 |
| FileChannel truncate(long size) | 将当前通道的文件截取为指定大小 |
| force(boolean metaData) | 强制将所有此通道内的文件更见写入到存储设备中 |
| long transferTo(long position, long count, WritableByteChannel target) | 将此通道内的指定位置和大小形成的区域写入到目标通道内 |
| long transferFrom(ReadableByteChannel src, long position, long count) | 将可读通道内的指定区域写入至当前通道内 |
- 基本的Channel示例
1 | public void ChannelTest() { |
注意
buf.flip()的调用,首先读取数据到 Buffer,然后反转 Buffer, 接着再从 Buffer 中读取数据,而在读取结束后,应当使用clear()或compact()来准备进行新的缓冲区操作
3. Buffer
发送给通道的所有数据都必须首先放到缓冲区中,从通道读取到的数据都必须要先加载进缓冲区中,不会直接由Channel进行读写操作
3.1 基本用法
使用Buffer读写数据,一般遵循以下四个步骤:
- 写入数据到Buffer缓冲区中
- 调用
flip()方法转换读写模式 - 从Buffer缓冲区中读取数据
- 调用
clear()方法或者compact()方法清空Buffer缓冲区
当向 buffer 写入数据时,buffer 会记录下写了多少数据(也就是几个属性字段:position, limit, capacity),一旦要读取数据,需要通过 flip() 方法将 Buffer 从写模式切换到读模式
在读模式下,可以读取之前写入到 buffer 的所有数据,一旦读完了所有的数据,就需要清空缓冲区,让它可以再次被写入
有两种方式能清空缓冲区:调用 clear() 或 compact() 方法,clear() 方法会清空整个缓冲区,compact() 方法只会清除已经读过的数据,任何未读的数据都被移到缓冲区的起始处,新写入的数据将放到缓冲区未读数据的后面
3.2 capacity,position 和 limit
Buffer中通常包含以下三个属性:
- Capacity —— 容量
- Position —— 所在位置
- Limit —— 最远到达位置
其中position和limit的含义取决于Buffer处于读模式还是写模式,而不管Buffer处于什么模式,capacity的含义都是一样的,表示缓冲区的容量大小
作为一个内存块,Buffer有一个固定的大小值,称为“capacity”,只能往里边写capacity个byte、long或char等类型,一旦Buffer满了之后,需要将其清空(通过读数据或清除数据),才能继续往Buffer中写数据
- position
当写数据至Buffer中时,position表示当前的位置,初始的position位置为0,当一个byte、long或char类型等数据写到Buffer后,position会向前移动到下一个可插入数据的Buffer单元,position最大可为capacity - 1,此处对应数组下标
当从Buffer中读数据时,也是从某个特定位置开始读取,当将Buffer从写模式切换到读模式,position就会被置为0,当从Buffer的position处读取数据时,position向前移动到下一个可读的位置
- limit
在写模式下,Buffer的limit表示最多能往Buffer里写多少数据,等于Buffer的capacity
当切换至读模式时,limit则表示最多能读多少数据,因此当切换Buffer至读模式时,limit就会被设置成写模式下的position值(超过写模式下的position值都是空的)
3.3 Buffer的类型
Java NIO中有以下八种Buffer类型:
- ByteBuffer
- MappedByteBuffer
- CharBuffer
- DoubleBuffer
- FloatBuffer
- IntBuffer
- LongBuffer
- ShortBuffer
由上述几种类型可知,不同的Buffer类型代表了不同的能读写的数据类型,除了MappedByteBuffer外,其他类型的Buffer相对应地可以通过char,short,long,int,byte,float,double等类型来操作缓冲区中的字节
3.4 Buffer大小分配
必须通过分配大小来实现获取Buffer缓冲区,在allocate方法初始化Buffer的时候,必须为其提供一个capacity参数,其单位通常为字节,具体实例如下所示:
1 | # 分配一个48字节的ByteBuffer |
3.5 写数据
写数据到Buffer有两种方式:
- 从Channel通道中读取数据至Buffer中
- 从一个Buffer中使用
put()方法写入到另一个Buffer中
3.6 读数据
从Buffer中读数据有两种方式:
- 从Buffer中读取数据至Channel通道
- 使用
get()方法读取Buffer中的数据
3.7 其他方法
rewind() 方法
rewind() 将 position 设回 0(数据仍然存在),所以可以重读 Buffer 中的所有数据。limit 保持不变,仍然表示能从 Buffer 中读取多少个元素(byte、char 等)
clear() 与 compact() 方法
一旦读完 Buffer 中的数据,需要让 Buffer 准备好再次被写入,可以通过clear()或 compact() 方法来完成
如果调用的是clear()方法,position 将被设回 0,limit 被设置成 capacity 的值,换句话说,Buffer 被清空了,Buffer 中的数据并未清除,只是这些标记表示哪里开始往 Buffer 里写数据,源码如下所示
1 | public final Buffer clear() { |
如果 Buffer 中有一些未读的数据,调用 clear() 方法,数据将 “被遗忘”,意味着不再有任何标记会告诉哪些数据被读过,哪些还没有
如果 Buffer 中仍有未读的数据,且后续还需要这些数据,但是此时想要先写数据,那么使用 compact() 方法
compact() 方法将所有未读的数据拷贝到 Buffer 起始处,也就是整理碎片,然后将 position 设到最后一个未读元素正后面,limit 属性依然像 clear() 方法一样,设置成 capacity,当 Buffer 准备好写数据了,不会覆盖未读的数据
mark() 与 reset() 方法
通过调用 mark() 方法,可以标记 Buffer 中的一个特定 position,之后可以通过调用 reset() 方法恢复到这个 position,例如:
1 | buffer.mark(); |
equals() 与 compareTo() 方法
可以使用 equals() 和 compareTo() 方法对比两个 Buffer
equals()
当满足下列条件时,表示两个 Buffer 相等:
- 有相同的类型(byte、char、int 等)
- Buffer 中剩余的 byte、char 等的个数相等。
- Buffer 中所有剩余的 byte、char 等都相同
compareTo()
compareTo()方法比较两个 Buffer 的剩余元素 (byte、char 等), 如果满足下列条件,则认为一个 Buffer“小于” 另一个 Buffer:
- 第一个不相等的元素小于另一个 Buffer 中对应的元素
- 所有元素都相等,但第一个 Buffer 比另一个先耗尽 (第一个 Buffer 的元素个数比另一个少)
Tips:剩余元素是从 position 到 limit 之间的元素
4. Scatter / Gather
Java NIO开始支持Scatter / Gather,用于描述从Channel通道中读取和写入到Channel的操作
分散(Scatter)是指从一个 Channel(通道)中读取数据并将其分散到多个 ByteBuffer 中,它通常用于将数据按不同的部分分开,例如读取一个消息的头和主体到不同的缓冲区Buffer中
聚集(Gather)是指将多个ByteBuffer中的数据集中写入至一个Channel通道中
5. Selector
Java NIO实现了IO多路复用中的Reactor模型,也就是一个Thread线程使用一个Selector(选择器)通过轮询来监听多个Channel - 通道上的事件,并使得一个线程就能够处理多个事件
过程中,需要将Selector监听的Channel - 通道使用configureBlocking(false)方法配置为非阻塞模式,以便当监听的Channel - 通道上未有IO事件时,能够继续轮询下一个Channel - 通道,防止出现阻塞,有效地避免由于阻塞产生额外的线程,基于这一点能够带来较大的性能提升
需要注意的是,只有ServerSocketChannel才可以配置为非阻塞模式,而FileChannel是不可以配置为非阻塞模式的

5.1 Selector的创建
通过调用Selector.open()方法创建一个Selector,如下所示:
1 | Selector selector = Selector.open(); |
5.2 注册Channel通道
为了使Channel与Selector配合工作,需要在Selector选择器中注册Channel通道,通过Channel.register(Selector sel,int ops)方法实现
由于Channel必须是非阻塞的,所以FileChannel不适用Selector,因为FileChannel不能切换为非阻塞模式,更准确的来说是因为FileChannel没有继承SeletableChannel,Socket Channel可以正常使用
SelectableChannel抽象类有一个configureBlocking()用于使通道处于阻塞模式或非阻塞模式,如下所示:
1 | // 开启非阻塞模式 |
其中Channel.register(Selector sel,int ops)方法中的第一个参数指定了注册的目标选择器,而第二个参数指定的是选择器需要查询的通道操作
可以供选择器查询的通道操作,从类型来分,包括以下四种:
(1)可读 : SelectionKey.OP_READ
(2)可写 : SelectionKey.OP_WRITE
(3)连接 : SelectionKey.OP_CONNECT
(4)接收 : SelectionKey.OP_ACCEPT
如果Selector对通道的多操作类型感兴趣,可以用“位或”操作符来实现:int ops = SelectionKey.OP_READ | SelectionKey.OP_WRITE ;
5.3 Selection Key
在每个Channel通道向Selector进行注册后,都将获得一个Selection Key,类似通常使用的Token,该Selection Key将在Channel通道调用的close()方法或主动调用cancel()方法取消后才失效,而在取消该Selection Key时,并不会立即生效,而是将其添加进Selector中的 cancelled-key Set集合中,待下次selection operation操作时再清除
在上述注册Channel通道时,register()方法都会返回一个SelectionKey对象,这个对象包含了一些属性:
- interest集合
- ready集合
- Channel
- Selector
- Others
interest集合
interest集合是所选择的感兴趣的事件集合,可以通过Selection Key读写interest集合,如下所示:
1 | int interestSet = selectionKey.interestOps(); |
用”位与”操作interest集合和给定的Selection Key变量,可以确定某个事件是否在interest集合中
ready集合
ready集合是通道以及准备就绪的操作集合。在一次Selection之后,会首先访问这个ready集合,可以通过以下方式读取ready集合。
1 | int readyOps = selectionKey.readyOps(); |
可以用类似判断interest集合的方法,检测Channel中有什么事件已经就绪,也可以使用以下方法进行判断。
1 | // 是否可接受 |
获取Channel / Selector
可以通过Selection Key获取Channel通道或Selector选择器,如下所示:
1 | // 获取对应的通道 |
还可以在用 register() 方法向 Selector 注册 Channel 的时候附加对象。如:
1 | SelectionKey key = channel.register(selector, SelectionKey.OP_READ, theObject); |
示例
这里有一个完整的示例,打开一个 Selector,注册一个通道注册到这个 Selector 上 (通道的初始化过程略去), 然后持续监控这个 Selector 的四种事件(接受,连接,读,写)是否就绪
1 | Selector selector = Selector.open(); |